
On-board Marine AC Critter Eviction and Stain Prevention
In the last article, we reviewed the flow of seawater through the AC system. I mentioned all the little critters that like to live in the AC system taking advantage of the high water flow rate and protection that's provided on the inside of the system. The problem with these guys is that life is a little too good for them in there. That being the case they have zero intent on moving out. There are ways to evict these squatters and preventative measures that can work to stop them from moving back in. Also mentioned, was tannin; I'm going to bounce you to WIKI if you're not familiar with what tannin is. Tannin is prevalent in harbors situated in fresh and brackish waters. A gift from trees, their rotting leaves, and other plant material. Tannin build-up provides a better foothold for creatures and can leave deep stains on fiberglass, hoses, AC components, or anything its in contact with for an extended period. Most notably, is the staining that can occur around the AC discharge thru-hulls. Traveling the inter-coastal waterway in NC, you might see a tannin brown stained bow or two on the boats that have passed through the Great Dismal Swamp. Tannin can age your boat's beauty quickly. I've attempted many methods of avoiding tannin stains, I haven't found the perfect fix yet, but just like the critters, there are some tricks to keeping the clean up from cutting into cocktail time.
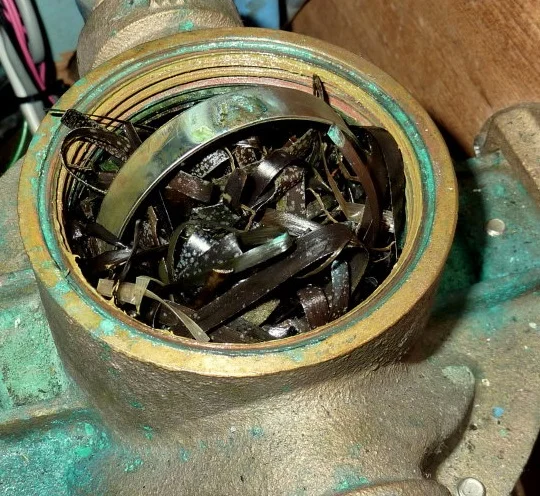
Sea Strainer full of seaweed and other little monsters
Critter prevention the lazy way:
The easiest way to deal with sea critter build up is relatively simple… don’t feed them. If you leave the AC off for 3+ days, the vast majority will die in the stagnant food & oxygen deficient water left in the system. Once you restore power, the water pressure from the AC pump will blow most of the critter leftovers overboard via the discharge thru-hull.
Another simple solution to handle them is with pool chlorine tablets. Now, I must stress this might not be compatible with your AC system; you need to have complete knowledge of all of the materials within your AC system before doing this or risk severe damage! These tablets are designed to be used in a pool filtration system to clarify the pool water. You can buy these tablets at most home improvement stores in gallon tubs. Place two or three tablets into the AC system sea strainer basket. They will dissolve slowly as the water moves over them. As they dissolve they release chlorine (bleach) into the water. The chlorine kills the growth in the system similar to way it does in a pool. There are potential issues with doing this! Any component in the system that is affected by bleach will also deteriorate, and you could end up with a system breach and flooding. Again, make sure each material in your system can handle contact with bleach before doing this method! Damage to sea life around the boat is minimal to none as the chlorine releases slowly and dilutes very quickly. Two to three tablets in the strainer is all that is necessary. It is possible to negate the effects of chlorine on the system via a zinc anode but doing this is complicated and requires professional evaluation and installation to protect everything.

UV Sterilizer. Simple and effective at stopping biologic growth in the AC system.
A semi-lazy critter killer can be purchased at a reasonable price via the aquarium business; The UV sterilizer. Plumbing a properly sized UV sterilizer directly before or after the AC pump will slow growth by killing the critter larvae before they can gain purchase in the system. The UV sterilizer runs on 120v electricity, the same as the AC pump. Wiring them to the same power circuit will trigger the sterilizer to turn on with the AC pump, slowing wear and saving electricity. Matching the flow rate ability (GPM) of the sterilizer to the output of the AC pump is essential for this method to work. Too small of a sterilizer will allow critters to get by. UV sterilizers work by emitting large amounts of UV light inside the water flow. The light damages the cell walls of microbes and larvae. Another way to say this is that it gives them a deadly sunburn. It will not keep you from having to perform maintenance on the sea strainer as the pool tablets can, and the bulb lens tube inside the sterilizer can be stained over time by tannin in the water. Cutting the efficacy of the unit by a large percentage. However, it's a clean, chemical-free way to slow critter clog. UV sterilizers do require periodical cleaning and bulb replacement. (I have a complete retrofit product idea that works on this principle if there are any engineers out there that are interested).
The hard way:

Barnacle Buster made by TRAC. When purchasing note whether it’s concentrate or pre mixed. Concentrate is the best bang.
For the unattended and clogged system that cleaning the sea strainer has little effect on, it's time to roll out the big guns. A product called Barnacle Buster is your friend. It can be expensive and labor intensive to have done, but it cleans like no other. There are several cleaning "systems" on the market for sale that are designed to work with Barnacle Buster for the do-it yourself crew. The prices range from $200 to $4000. I'm going to tell you how I built one for less than $100 with easily obtained components and how to use it to clean your system.
First, let's discuss how the chemical in Barnacle Buster works. It's not magic; on a basic level all it does is dissolve calcium. The majority of the critters taking up residence in the system use calcium as a means to attach themselves, build tissue, or build a protective shell. If you pass Barnacle Buster over them, they start to dissolve. Which is not fun, so they either let go of their hold to escape and flush away with the system water or go the way of the Wicked Witch of the West.
For this reaction to really work the Barnacle Buster must continuously stay in the AC water flow. Usually, one hour will do the trick. But, our AC system is not a closed-loop. If you introduce the Barnacle buster into the sea strainer and turn the system on the chemical will just run through and then out via the discharge thru-hull. You can try it this way by attempting to cut the system off just in time to save the Barnacle Buster from being flushed, but it doesn't work that well....trust me, I learned the hard way (thanks "Sea Flush Kit" for stealing my money).
Here is an inexpensive alternative that I came up with; you will need the following:
One storage tub, cheap, 18 gallons or so

18 Gallon Tub
One el cheapo 25' or 50 ' garden hose depending on how long your boat is, it needs to be a standard size 5/8" hose diameter, not an expandable junk one.
One 120v sump pump, Amazon $40-60 bucks, aim for higher head pressure rating over a unit with high GPM (gallons per minute), look for one with a garden hose 3/4" MPT output or one that comes with an adapter for the same.
2x 5/8" barbed hose splices, West Marine is your friend, expensive but always there for you
4x 5/8" hose clamps, West Marine or the hardware store, quality is whatever, no need to get fancy

Sump Pump with hose adapter

5/8” Barbed Hose Splice
The common cruiser and sailboat marine AC unit and it's system is plumbed with 5/8" hose, and most garden hose is 5/8". To do this method, it's essential that you treat one AC unit at a time if you have multiple units. Using the garden hose, tub and sump pump, we're going to make a closed loop that will recycle the Barnacle Buster through the AC system.
Turn the ACs off and close the petcock to the AC sea strainer. Place the tub in a stable location as close as possible to the AC pump. Remove the hose clamps and the 5/8" AC feed hose coming off the pump that runs to the first AC unit you want to service. In some systems, this feed hose might be attached to a distribution manifold that comes off the pump instead of directly to the pump. Using a heat gun can help to get the hose to soften and slide off the hose barb. Insert one of the 5/8" barbed splices into the AC feed hose and clamp it. Next, locate and access the AC discharge thru-hull inside the boat. Remove the 5/8" AC discharge hose from it and insert a 5/8" barbed splice into this hose and clamp it. Return to the tub, place the sump pump into the tub and hook the garden hose to it. Run the garden hose up to the splice you installed in the AC feed hose by the AC pump. Cut the garden hose to give you enough slack to run from the sump pump to the 5/8” splice without kinks or excess. Connect and clamp the garden hose to the 5/8" barbed splice coming out of the AC feed hose that you just installed. Gather the rest of the garden hose and head over to the AC discharge thru-hull, attach and clamp the cut end of the garden hose to the 5/8" barbed splice you installed on the AC discharge hose. Route the garden hose back to the tub. Cut off any excess hose at the tub. Just make sure that it's long enough to stay in the tub, but the shorter the hose, the better. The garden hose run from the AC discharge hose splice should be the long run of hose. Now, we've made a completely closed-loop system. You want to mix the Barnacle Buster with water via the instructions on the bottle. Do this in the tub. Plug the sump pump into a 120v outlet and let her rip. The Barnacle Buster will pump from the tub via the sump pump into the AC feed hose at the AC pump, flow through the AC system back out to the AC discharge hose, where instead of getting flushed overboard it will return into the tub via the garden hose. Then the chemical is recycled back through the system. The critters are exposed to the chemical in moving water which flushes them better than if the chemical just sits. After letting it run for an hour, the diluted Barnacle Buster in the tub will be really dark but still active. Switch to any other AC unit "circuits" and repeat (Feed and discharge hoses will be different for each circuit). Once you've done all of them, shut down the sump pump and disconnect just the AC discharge hose to garden hose connection. Re-attach the AC discharge to the thru-hull and clamp it (make sure to remove the 5/8" barbed splice first). Plug the sump pump back in and let it pump all of the wastewater in the tub overboard. Once you get the majority of water pumped out of the container, it's easier to handle the leftovers. Remove the barbed garden hose splice on the AC feed hose, reattach and clamp all hoses, clean the sea strainer, open the petcock, fire up the ACs, and check for leaks. You'll be right as rain. Clean and store the sump pump, garden hose, and splices in the tub. You can use this flush system for winterizing and Barnacle Busting other systems too.
Tannin staining on the hull around AC discharge thru-hulls is very common.
Tannin stains are one of the hardest stains to get out of fiberglass without causing damage to the gel coat. The only surefire way is by wet sanding followed by a variable grit compound high-speed buffing and finish waxing. Yes, you can use chemicals, such as FSR and even toilet bowl cleaner. The problem with using cleaners is that any chemical strong enough to remove the tannin will also strip the wax out of the pores of the gel coat. So, by using a chemical cleaner, you'll have the stain cleaned up, and the fiberglass is looking nice and white. However, you'll soon find that the stain will come back and with a vengeance. You'll attempt to clean it again to see that it's not quite all coming out. There will be a bit of a shadow left, and the stain will continue to come back again and again. What's happening, in this case, is that the tannin are staining the inner surfaces of the gel coat pores as each consecutive cleaning removes more of the wax located in the pores. As the pores empty of wax the stain settles in deeper. At some point, it gets so far down into the pore cavity that no matter how hard you scrub you won't be able to clear the stain. Fixing the staining is made all that much worse by the AC discharge thru-hulls being located in hard to reach areas while the boat is in the water.
The game here is to avoid the fiberglass staining altogether.
The following are the methods I've tried along with the results:
The most work-intensive way to handle this issue is chemical cleaning immediately followed by waxing. The idea is that you're stripping the stain and wax away but then promptly replacing the wax to put the protection back in place. The stain will eventually come back from use, but it won't set into the fiberglass. The stain only affects the wax and is much easier to clean off. Again, access to this area while the boat is afloat can be tricky. It’s best to use a carnauba paste wax for any areas that need protection like this. Carnauba wax doesn’t provide the nicest shine but it does give the best protection hands down. The idea of wax is that it takes the damage of a graze or UV attack instead of the gel coat or paint bearing the brunt. Any spray on quick wax type product is snake oil in this respect. Stay away from chemical waxes. They provide next to no protection. The sneaky thing is that they look good the day you put them on. But, this only lasts for a month or two. Their legacy will be a chalky white residue that will need to be compounded off before any actual polishing can be done. General rule, stay away from any “wax” that has the word “poly” in the description.

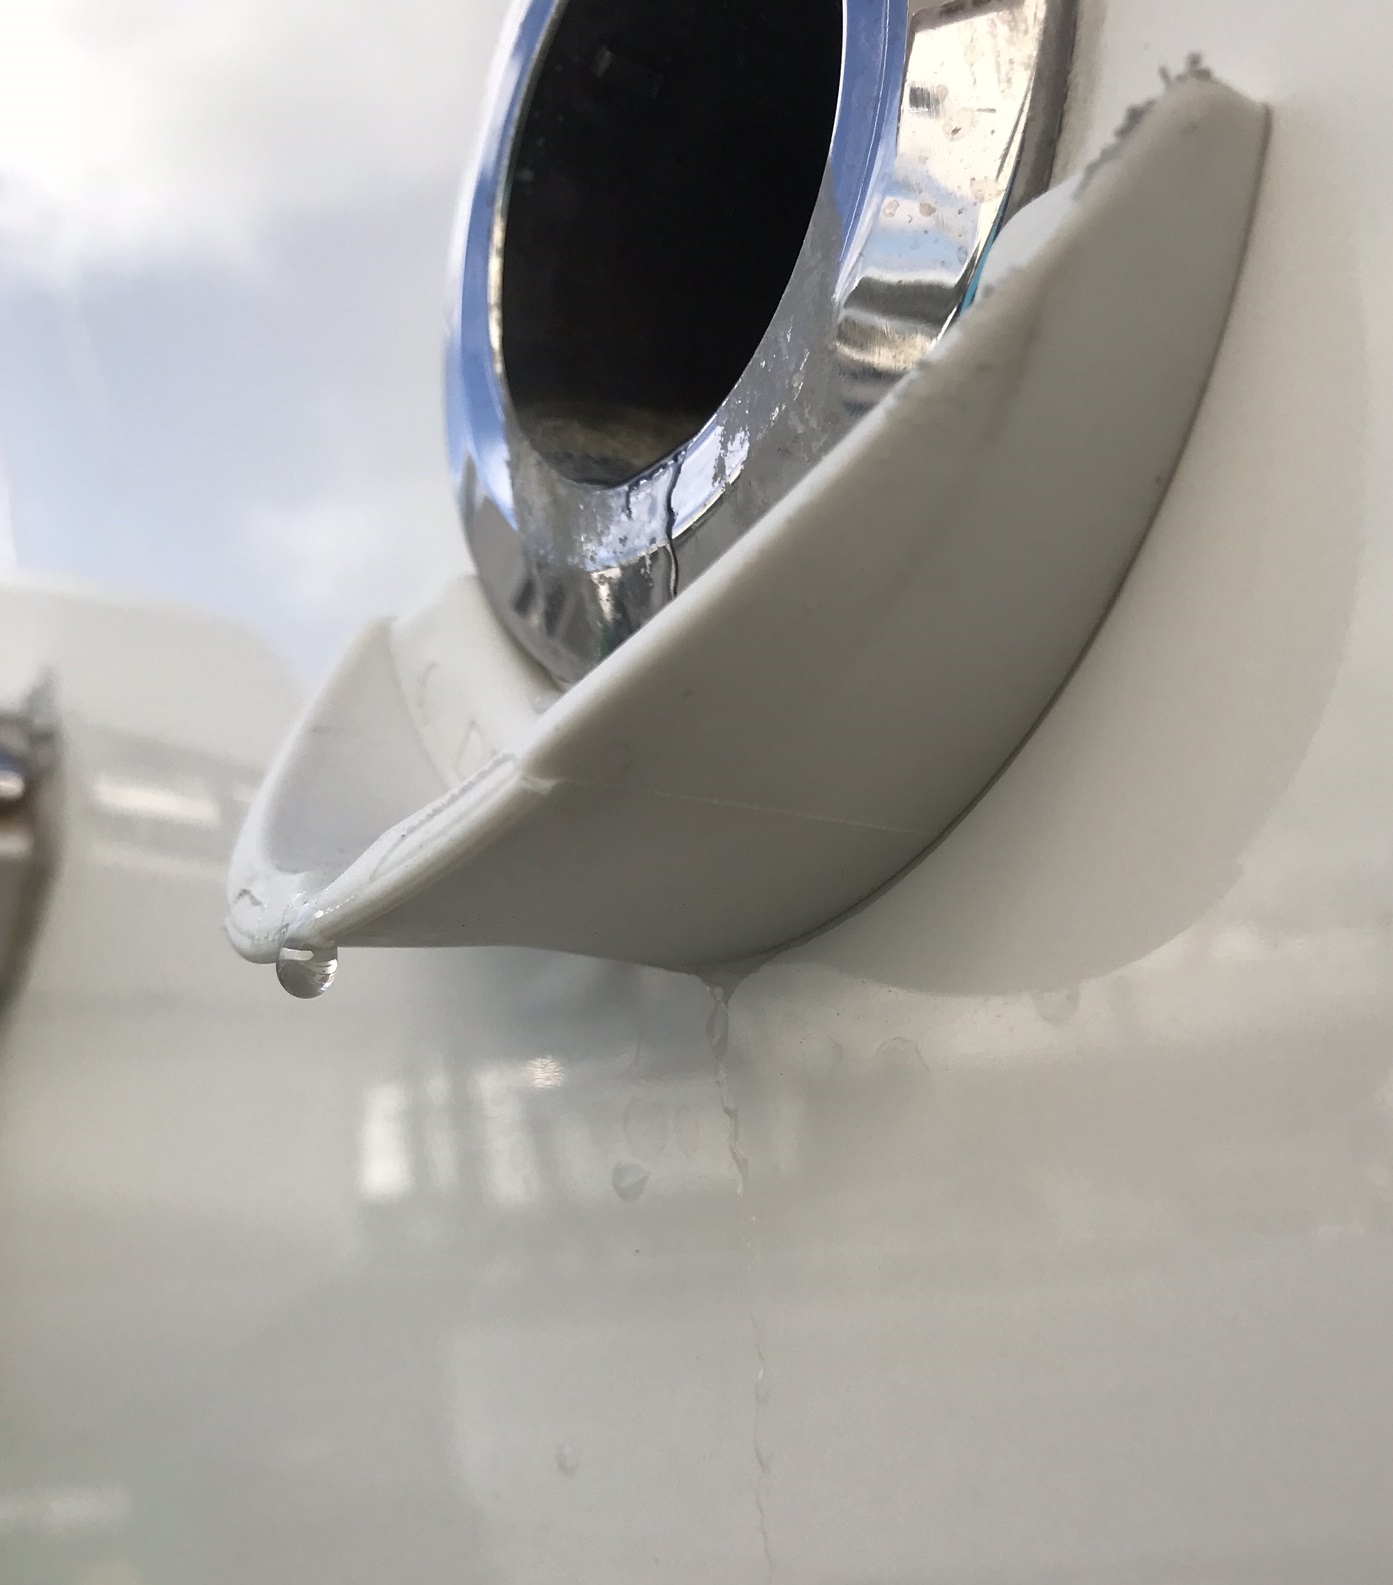
This is very mild tannin staining, I’ve seen what looks like a mountain man’s beard hanging from the thru-hull.
A proactive measure that seems to help is affecting the flow of water from the AC discharge thru-hull in such a way that you eliminate or minimize splatter and dripping against the hull.
Here I've tried several different methods. What I've found is that the success of these methods depends upon the discharge flow rate, the angle of the hull at the discharge point, height above the waterline and distance the discharge water arcs away from the hull before entering the water. The first method of trickery is the least expensive and is the hands-down winner for the ugliest. Purchase a small section of clear vinyl or white PVC tube that the outer diameter matches the inner diameter of the AC discharge thru-hull. A tight fit is best. Test fit an 8" length of tubing into the thru-hull. If it's nice and snug, add a pea-sized bit of LifeSeal to the six o'clock position between the tube and thru-hull to hold the tube in place during use. If it's not a snug fit, you may have to try a different tube, or you can run some silicone leak repair tape around the tube to fatten it up. Once the piece of tubing is secure, you'll want to cut a 45-degree angle across the tube to form a spout. Nip the pointy end off to give it a more finished look. This method works best on steep hull angles (80-90 degrees to the water). It works by extending the water flow out further away from the hull to minimize splash back and dribbling. Downsides: Eventually the water flow will harden the tube leading to a blow out of the spout, polluting the water with spout trash. Also, the tubing will discolor under the sun, become tannin stained and will grow a beard of critters on the outflow — all within about a week or two of constant use. The bonus here is that you can replace it on the cheap and with minimal effect on the hull sides. Inexpensive, easy to do, and only requires a pair of scissors to install. But, I would consider this as a disposable solution that will require many renewals.

Vinyl tube jammed into the thru-hull and cut at an angle to make a spout
Next is a product that is designed to stop staining and critter beards. It couldn't be easier to install. Its called: Dripper Guard. What I found with these; Again, hull angle is all important here. These guys will not work on 80-90 degree hull sides because of a small amount of water pooling that occurs on the lip at steeper angles. The water builds up and then runs under the lip and down the hull, which is what we want to avoid. The Dripper Guard's flexible material is porous and will stain easily as well. It kind of looks weird too. The ones that I installed on Coraline started peeling off after about two months. Even with proper surface prep. It seems that the material releases it's adhesive tape if exposed to direct sunlight for the better portion of the day. Most likely, its emollients releasing from the Dripper Guard material in the heat that dislodge the adhesive tape. As the tape stayed adhered to the hull but the Dripper Guard fell away. Again, an 80-90 degree straight hull side provides little shading from the sun and accelerates the failure. Just like the tube method it eventually ends up as pollution. Not great. I’d consider this product as a disposable. The only Dripper Guards that remain on Coraline are located at the bow scuppers. They’re at about a 45 degree angle and have performed well at stopping the drip stain that builds there from soap and wash down dirt.
Dripper Guard installed on Coraline on 90 degree section of the hull. See the trail of water against the hull. That is residual from that drip hanging.
My favorite looking and longest lasting solution is a thru hull with a drip lip formed into it. These particular ones are from MarineTown. Definitely the most labor-intensive solution. MarineTown rolled a flange into the thru-hull mounting lip that forms a drip edge, unlike the standard flush or mushroom head thru-hull. With a flush or mushroom head, discharge water dribbles down the mounting rim onto the hull side, which is where the staining and critter goop come in. The MarineTown has a drip lip extended out from the thru-hull. The water dribble falls from this edge instead of running down the hull. It's not the perfect solution. Again, the hull angle plays a big part in whether the water drips to the waterline without hitting the boat. But, it looks clean, requires zero maintenance, will last for years and doesn't pollute. The design of these drip lips is limited in one way. If they extend to far away from the hull, the chances go up that something will snag or crush it. The MarineTown units are a happy medium. Best on an 80 degree or lower angle. They don't extend far enough out to be a worry. On a 90-degree hull side angle like Coraline's, I did get some dribble. I feel that if the lip stuck out further, it would be the perfect stain protector, but it wouldn't stand a chance rubbing a piling by mistake. This thru-hull is not a forged solid piece, a brush with a piling will probably end it. It should only be installed in a well-protected location. If they decide to make a forged unit, it might be the perfect discharge thru-hull. As of this writing, they're the only game in town doing the drip lip thru-hull. I applaud them for going down this route.
3M has some decent self healing protector vinyl
The most durable, least expensive, best looking of the “disposable” options to this problem that I’ve found is a clear vinyl protector. Similar to a cell phone screen protector. You can purchase a sheet of clear 3M vinyl and install it on the hull around the thru-hulls down to the waterline. Forming what amounts to a thru-hull bib. It will clean easily during your regular wash down with soap and water. It will last 3-5 years before needing to be replaced for staining and yellowing (regardless of non-yellowing claims). Upon removal, the area will need to be wet sanded and buffed to blend the fiberglass "ages." The glass under the protector will be like new. The glass around the protector will be a little more aged leaving a shadow of sorts. Alternatively, you could use stainless steel in the same "bib" manner. A thin gauge sheet cut to spec by a metal shop and adhered to the skin of the hull could look smart on the right boats. It would last almost as long as the boat. If it stains, a quick compounding and buffing, it will be like new.
In the next article, I'll cover some of the electronic components of the AC system that you may be able to diagnose yourself with some simple deductive switch flipping.
Cheers Mike from Lifesaport